Introduction
Few ingredients have the power to transform a simple meal into something extraordinary quite like Roasted Garlic Butter. This condiment is the ultimate secret weapon, melding the sweet, mellow depth of slow-roasted garlic with the rich creaminess of butter. Far more than just a spread, this homemade flavored butter is a versatile foundation for countless dishes, adding a gourmet touch with minimal effort.
Making your own roasted garlic butter at home is surprisingly simple and infinitely superior to store-bought alternatives. The process of roasting tames the garlic’s raw bite, unlocking a complex, nutty, and caramelized sweetness that permeates every molecule of the butter. This recipe yields a luxurious, spreadable compound butter that you can use immediately, log for future meals, or gift to any food-loving friend.
Ingredients List
The beauty lies in its simplicity. This recipe makes one generous log (about 1 cup).
- 1 cup (2 sticks / 227g) unsalted butter, at room temperature
- 1 large head of garlic
- 1 teaspoon extra-virgin olive oil
- ½ teaspoon kosher salt, plus more to taste
- ¼ teaspoon freshly ground black pepper (optional)
- 1 tablespoon finely chopped fresh parsley or chives (optional, for color and freshness)
Equipment Needed
- Small baking dish, ramekin, or aluminum foil
- Sharp knife
- Small bowl
- Fork or small silicone spatula
- Plastic wrap, parchment paper, or wax paper
Step-by-Step Instructions
Part 1: Roasting the Garlic
Step 1: Preheat and Prep
Preheat your oven to 400°F (200°C). This high heat is perfect for caramelizing the garlic quickly without drying it out Roasted Garlic Butter.
Step 2: Prepare the Garlic Head
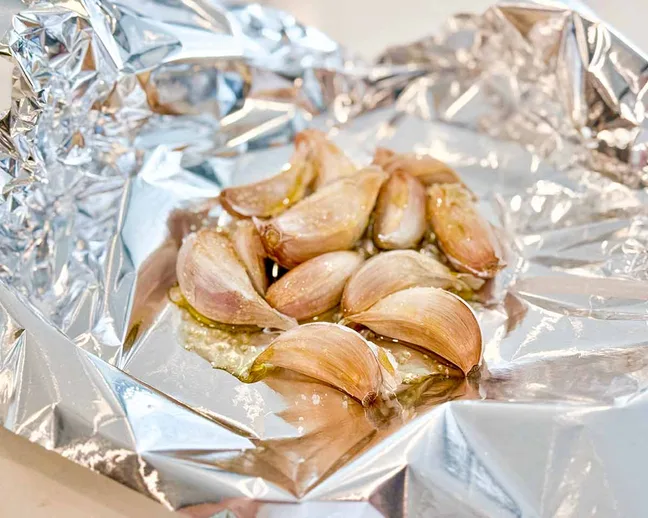
Place the whole head of garlic on a cutting board. Using a sharp knife, slice off about ¼ to ½ inch from the top (the pointy end) of the head. This exposes the cloves inside. Discard the top slice Roasted Garlic Butter.
Step 3: Dress and Wrap
Place the trimmed garlic head in a small baking dish or on a square of aluminum foil. Drizzle the exposed cloves with the teaspoon of olive oil, ensuring it seeps down between them. For the foil method, bring the edges up and twist to create a sealed packet Roasted Garlic Butter.
Step 4: Roast to Golden Sweetness
Place the dish or foil packet in the preheated oven. Roast for 40-45 minutes. The garlic is done when the individual cloves are deeply golden brown, extremely soft, and easily pierced with a fork or knife. The aroma will be sweet and irresistible Roasted Garlic Butter.
Step 5: Cool and Extract
Remove the garlic from the oven and let it cool until it’s easy to handle. Once cool, squeeze the base of the head or use a small fork to push the soft, caramelized cloves out of their papery skins and into a small bowl. Mash them lightly with a fork into a paste Roasted Garlic Butter.
Part 2: Making the Compound Butter
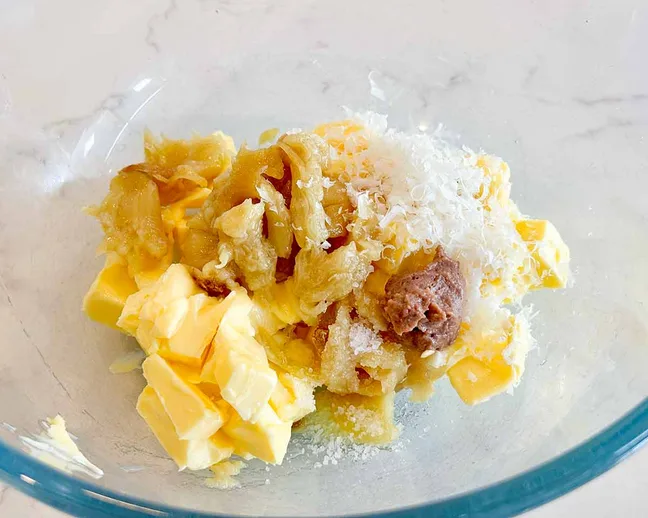
Step 6: Soften and Combine
Ensure your butter is at a cool room temperature—soft enough to mix easily but not melted or oily. In a medium bowl, combine the softened butter, the roasted garlic paste, ½ teaspoon of kosher salt, and the optional black pepper and fresh herbs.
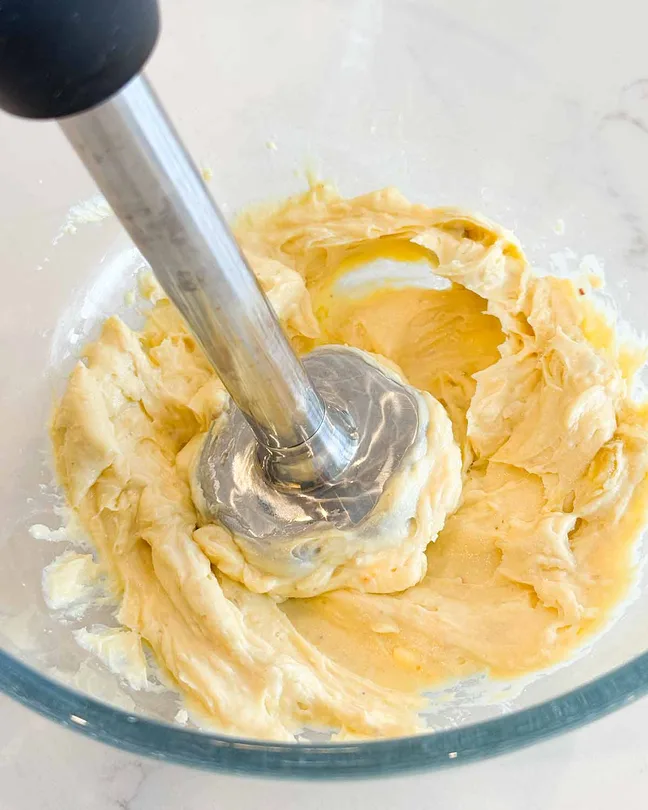
Step 7: Mix Thoroughly
Using a fork, small spatula, or the back of a spoon, mash and mix all ingredients together until they are completely and uniformly combined. Taste and adjust with a pinch more salt if desired.
Part 3: Forming and Storing
Step 8: Shape the Log
Lay a 12-inch piece of plastic wrap, parchment paper, or wax paper on your counter. Spoon the garlic butter mixture onto the center of the paper, shaping it into a rough log.
Step 9: Roll and Chill
Use the paper to help you roll and shape the butter into a neat cylinder about 6-7 inches long. Twist the ends of the paper tightly to seal. For clean slices, you can place the log in the cardboard tube from a used-up roll of paper towels or plastic wrap before chilling. Refrigerate for at least 2 hours, or until firm.
Step 10: Slice and Use
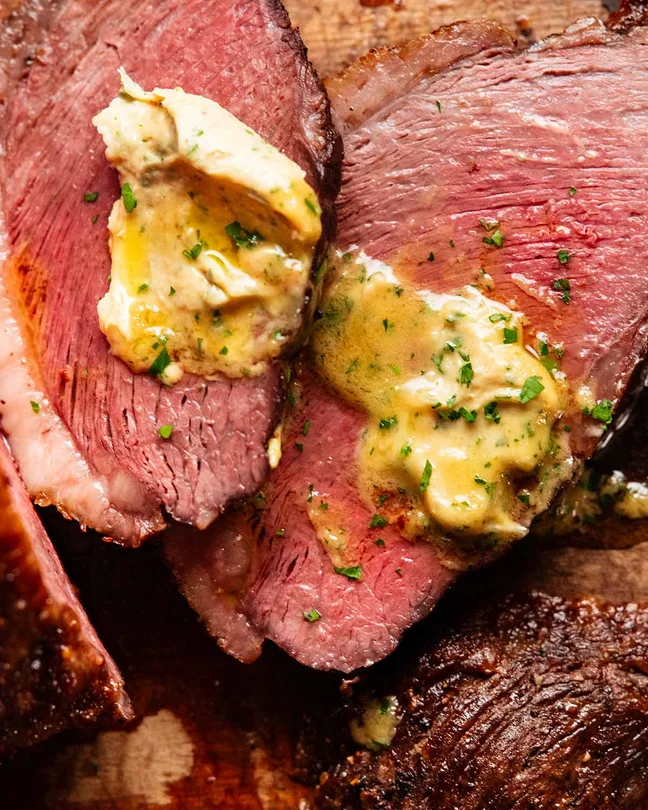
Once firm, your roasted garlic butter is ready. Unwrap and slice into rounds for serving on steak or bread, or use it by the tablespoon directly in pans for cooking.
Tips and Substitutions for Success
- Garlic Prep Shortcut: To save time, you can roast pre-peeled garlic cloves. Toss them in olive oil and roast in a foil packet for 20-25 minutes until soft and golden.
- Butter Choice: Always use unsalted butter so you can control the seasoning. High-quality, cultured European-style butter will yield an even richer flavor.
- Flavor Variations:
- Herb & Garlic: Add 1 tablespoon each of finely chopped parsley, chives, and thyme.
- Lemon Garlic: Add 1 teaspoon of finely grated lemon zest and a squeeze of juice.
- Spicy Garlic: Add ¼ teaspoon of crushed red pepper flakes or a dash of smoked paprika.
- Serving Suggestions:
- Steakhouse Classic: Top a grilled steak or burger with a slice.
- Bread & Rolls: Spread on warm, crusty bread or dinner rolls.
- Vegetables: Toss with roasted potatoes, green beans, or corn on the cob.
- Pasta: Melt into hot pasta with a splash of pasta water for a quick sauce.
- Seafood: Place a slice on top of grilled fish, shrimp, or scallops.
- Storage & Shelf Life:
- Refrigerator: Store tightly wrapped in the fridge for up to 2 weeks.
- Freezer: This homemade compound butter freezes beautifully for up to 3 months. Slice it before freezing for easy use. Thaw in the refrigerator overnight.
- Gifting: A log of homemade roasted garlic butter, wrapped in parchment and tied with twine, makes a thoughtful and impressive food gift.
Nutritional Information
Per tablespoon serving (approximate):
- Calories: ~100 kcal
- Total Fat: 11g
- Saturated Fat: 7g
- Cholesterol: 30mg
- Sodium: 75mg (varies with added salt)
- Total Carbohydrates: 1g
- Protein: 0g
Table of Contents
Table of Contents
Note: This is a concentrated flavoring agent and condiment, meant to be used in moderation to enhance other dishes. The primary nutritional contribution is fat from the butter, with the roasted garlic providing minimal calories but beneficial compounds like allicin Roasted Garlic Butter.
Conclusion
Mastering Roasted Garlic Butter is a small kitchen project with enormous dividends. It encapsulates the core principle of great cooking: building layers of flavor from simple, quality ingredients. The hour it takes to roast the garlic is mostly hands-off time, and the resulting butter elevates everything it touches, from the humblest piece of bread to the most expensive cut of meat.
Having a log of this golden, fragrant butter in your fridge or freezer is like having a fast-pass to deliciousness. It’s a testament to the idea that the most impactful culinary creations are often the simplest, and that a little patience in preparation can yield a staple you’ll rely on for years to come Roasted Garlic Butter.
PrintIncredible Roasted Garlic Butter: An Easy, 3-Ingredient Flavor Bomb

Make easy Roasted Garlic Butter in 1 hour! Just 3 ingredients for a versatile compound butter perfect for steak, bread, pasta, and vegetables.
Ingredients
The beauty lies in its simplicity. This recipe makes one generous log (about 1 cup).
-
1 cup (2 sticks / 227g) unsalted butter, at room temperature
-
1 large head of garlic
-
1 teaspoon extra-virgin olive oil
-
½ teaspoon kosher salt, plus more to taste
-
¼ teaspoon freshly ground black pepper (optional)
-
1 tablespoon finely chopped fresh parsley or chives (optional, for color and freshness)
Equipment Needed
-
Small baking dish, ramekin, or aluminum foil
-
Sharp knife
-
Small bowl
-
Fork or small silicone spatula
-
Plastic wrap, parchment paper, or wax paper
Instructions
Step 1: Preheat and Prep
Preheat your oven to 400°F (200°C). This high heat is perfect for caramelizing the garlic quickly without drying it out.
Step 2: Prepare the Garlic Head
Place the whole head of garlic on a cutting board. Using a sharp knife, slice off about ¼ to ½ inch from the top (the pointy end) of the head. This exposes the cloves inside. Discard the top slice.
Step 3: Dress and Wrap
Place the trimmed garlic head in a small baking dish or on a square of aluminum foil. Drizzle the exposed cloves with the teaspoon of olive oil, ensuring it seeps down between them. For the foil method, bring the edges up and twist to create a sealed packet.
Step 4: Roast to Golden Sweetness
Place the dish or foil packet in the preheated oven. Roast for 40-45 minutes. The garlic is done when the individual cloves are deeply golden brown, extremely soft, and easily pierced with a fork or knife. The aroma will be sweet and irresistible.
Step 5: Cool and Extract
Remove the garlic from the oven and let it cool until it’s easy to handle. Once cool, squeeze the base of the head or use a small fork to push the soft, caramelized cloves out of their papery skins and into a small bowl. Mash them lightly with a fork into a paste.
Part 2: Making the Compound Butter
Step 6: Soften and Combine
Ensure your butter is at a cool room temperature—soft enough to mix easily but not melted or oily. In a medium bowl, combine the softened butter, the roasted garlic paste, ½ teaspoon of kosher salt, and the optional black pepper and fresh herbs.
Step 7: Mix Thoroughly
Using a fork, small spatula, or the back of a spoon, mash and mix all ingredients together until they are completely and uniformly combined. Taste and adjust with a pinch more salt if desired.
Part 3: Forming and Storing
Step 8: Shape the Log
Lay a 12-inch piece of plastic wrap, parchment paper, or wax paper on your counter. Spoon the garlic butter mixture onto the center of the paper, shaping it into a rough log.
Step 9: Roll and Chill
Use the paper to help you roll and shape the butter into a neat cylinder about 6-7 inches long. Twist the ends of the paper tightly to seal. For clean slices, you can place the log in the cardboard tube from a used-up roll of paper towels or plastic wrap before chilling. Refrigerate for at least 2 hours, or until firm.
Step 10: Slice and Use
Once firm, your roasted garlic butter is ready. Unwrap and slice into rounds for serving on steak or bread, or use it by the tablespoon directly in pans for cooking.