Introduction
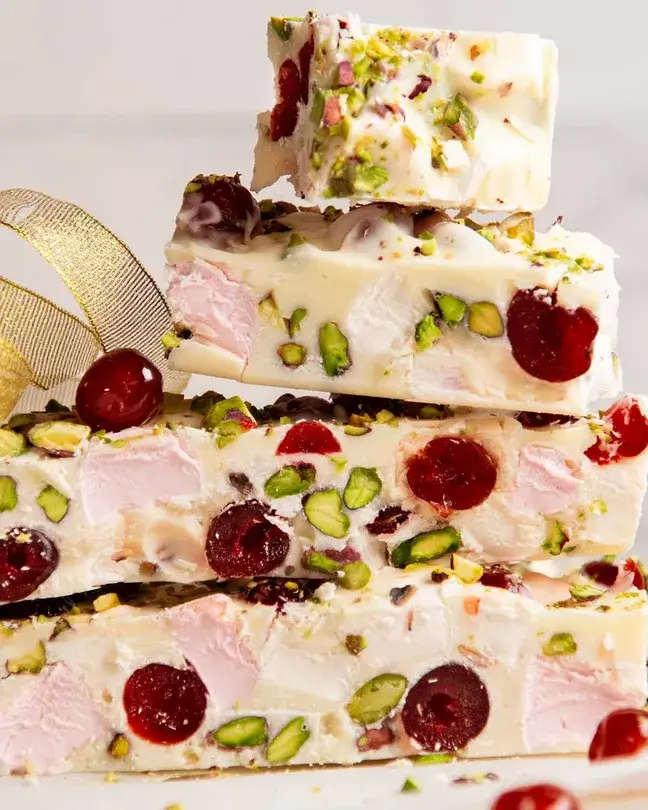
Elevate your holiday dessert table with this stunning White Christmas Rocky Road. This delectable no-bake treat is the perfect festive fusion, combining the creamy luxury of white chocolate with the cheerful textures of classic rocky road.
Unlike traditional versions made with dark chocolate, this white chocolate rocky road is a visually snowy delight, packed with crunchy biscuits, chewy dried cranberries, and festive pistachios.
It’s incredibly easy to make, requires zero baking time, and is a fantastic recipe to make with kids during the busy holiday season.
This White Christmas Rocky Road is not just a sweet treat; it’s a gift-worthy confection that promises to be the star of your cookie platter or dessert box.
Ingredients for White Christmas Rocky Road
For the best results, use a good quality white chocolate for superior flavor and smooth melting. Gather these simple ingredients:
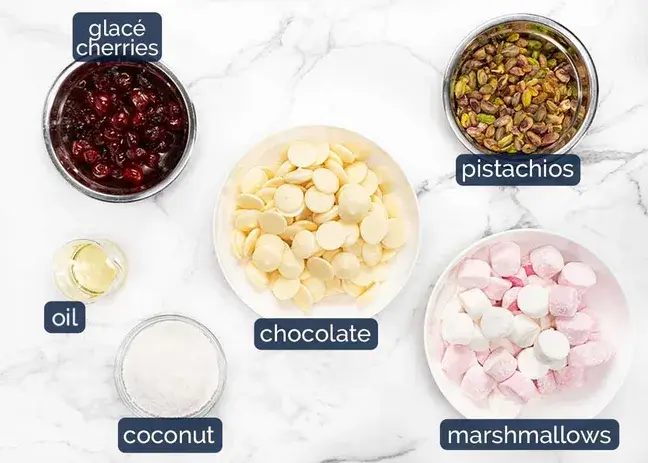
- 500g (about 17.6 oz) good quality white chocolate, roughly chopped
- 100g (about 3.5 oz) unsalted butter, cubed
- 2 tablespoons (30ml) golden syrup, honey, or light corn syrup
- 150g (about 5.3 oz) plain sweet biscuits or cookies (like Marie, Arrowroot, or Digestives), broken into small chunks
- 100g (about 3.5 oz) dried cranberries
- 100g (about 3.5 oz) shelled pistachios, roughly chopped
- 100g (about 3.5 oz) mini marshmallows
- Optional for decoration: A dusting of icing sugar, extra chopped pistachios, dried cranberries, or a drizzle of melted white chocolate White Christmas Rocky Road.
Equipment Needed
- 20cm x 20cm (8-inch) square baking tin
- Baking paper or parchment paper for lining
- Large heatproof mixing bowl
- Saucepan for a double boiler (or microwave-safe bowl)
- Spatula
- Sharp knife for slicing
Table of Contents
Table of Contents
Step-by-Step Instructions
Step 1: Prepare the Tin
White Christmas Rocky Road Begin by thoroughly lining your square baking tin with baking paper. Ensure the paper overhangs on two opposite sides; these “handles” will make it incredibly easy to lift the set rocky road out of the tin later. Smooth out any wrinkles for a neat finish. Set the tin aside.
Step 2: Melt the White Chocolate Base
Create a double boiler by placing a heatproof bowl over a saucepan of gently simmering water, ensuring the bottom of the bowl does not touch the water. Add the chopped white chocolate, cubed butter, and golden syrup to the bowl. Stir gently and continuously with a spatula until the mixture is completely smooth, glossy, and well combined. This gentle heat prevents the white chocolate from seizing. Remove the bowl from the heat once melted. Alternatively, you can melt this mixture in a microwave-safe bowl in 30-second bursts on medium power, stirring well between each burst White Christmas Rocky Road.
Step 3: Combine with Festive Mix-Ins
Allow the melted chocolate mixture to cool for 2-3 minutes. This prevents the marshmallows from melting when added. Now, add all your prepared festive mix-ins to the bowl: the broken biscuit chunks, dried cranberries, chopped pistachios, and mini marshmallows. Using your spatula, fold everything together until every piece is evenly coated in the luxurious white chocolate mixture. The combination of red cranberries and green pistachios creates a wonderfully festive color palette.
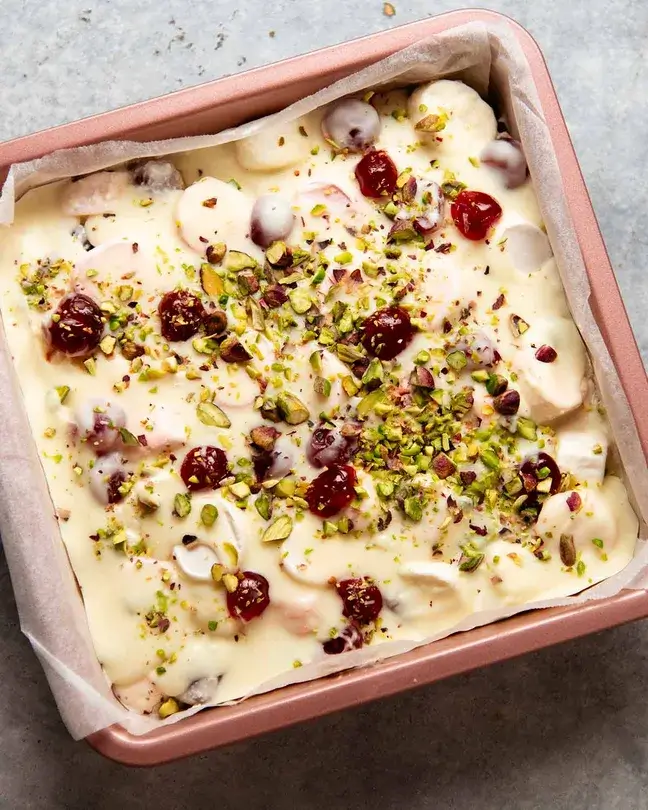
Step 4: Press into the Tin and Set
Pour the combined white chocolate rocky road mixture into your prepared tin. Use the spatula, and then clean, lightly damp hands to press the mixture down firmly and evenly into all corners. A firm press ensures the slice holds together well when cut. For a decorative finish, scatter a few extra cranberries, pistachios, or mini marshmallows on top and press them in gently White Christmas Rocky Road.
Step 5: Chill Until Firm
Place the tin in the refrigerator for at least 3-4 hours, or preferably overnight, to allow the rocky road to set completely. This no-bake slice relies on the white chocolate re-solidifying to hold its shape White Christmas Rocky Road.

Step 6: Slice and Serve
Once fully set, use the parchment paper handles to lift the entire slab of White Christmas Rocky Road out of the tin and onto a cutting board. Using a large, sharp knife (wiping it clean with a hot cloth between cuts helps get clean slices), cut into squares or rectangles. For a festive touch, you can dust the top with a little icing sugar just before serving to resemble snow.
Tips, Tricks, and Substitutions
- Ingredient Substitutions:
- Biscuits/Cookies: Graham crackers, vanilla wafers, or even ginger snaps work beautifully.
- Nuts: Swap pistachios for almonds, macadamias, or hazelnuts. For a nut-free version, use sunflower or pumpkin seeds.
- Dried Fruit: Substitute cranberries with chopped dried apricots, cherries, or raisins.
- Marshmallows: Use standard marshmallows chopped into quarters if you can’t find mini ones.
- Add-Ins: Feel free to include 1/2 cup of desiccated coconut, chopped white chocolate, or even a sprinkle of freeze-dried raspberry powder for extra flavor and color.
- Serving Suggestions: This Christmas rocky road is perfect as part of a holiday dessert platter, packaged in cellophane bags as edible gifts, or served with coffee after a festive meal. It’s a guaranteed crowd-pleaser.
- Storage Instructions: Store your rocky road in an airtight container in the refrigerator for up to 2 weeks. The cool temperature keeps the white chocolate firm. It can also be frozen for up to 3 months; simply thaw in the refrigerator before serving.
- Expert Tip: For perfectly clean slices, heat your knife under hot water, dry it quickly, and then cut. The warm blade will glide through the chocolate cleanly White Christmas Rocky Road.
Nutritional Information
(Please note: The following is an approximate estimate per serving, assuming the batch is cut into 16 squares. Actual values may vary based on specific ingredients and brands used.)
- Calories: ~320 kcal
- Total Fat: 18g
- Saturated Fat: 9g
- Carbohydrates: 36g
- Sugars: 28g
- Protein: 4g
- Fiber: 1g
This easy rocky road is an indulgent treat best enjoyed in moderation as part of a balanced diet. The dried cranberries and pistachios do offer small amounts of antioxidants and healthy fats.
Conclusion
This White Christmas Rocky Road is more than just a recipe; it’s a simple, joyful holiday project that yields delicious results.
Its no-fuss, no-bake nature makes it a lifesaver during the hectic festive period, while its beautiful appearance and irresistible taste make it a memorable treat.
By combining creamy white chocolate with festive fruits and nuts, you create a holiday dessert that perfectly captures the spirit of the season.
Whether you’re making it for a party, as a homemade gift, or just as a special family treat, this slice of festive cheer is sure to become a cherished part of your Christmas traditions.
So gather your ingredients and whip up a batch of this magical white chocolate rocky road today
PrintWhite Christmas Rocky Road Recipe: An Easy 6-Ingredient No-Bake Treat

Elevate your holiday dessert table with this stunning White Christmas Rocky Road. This delectable no-bake treat is the perfect festive fusion, combining the creamy luxury of white chocolate with the cheerful textures of classic rocky road.
Ingredients
-
500g (about 17.6 oz) good quality white chocolate, roughly chopped
-
100g (about 3.5 oz) unsalted butter, cubed
-
2 tablespoons (30ml) golden syrup, honey, or light corn syrup
-
150g (about 5.3 oz) plain sweet biscuits or cookies (like Marie, Arrowroot, or Digestives), broken into small chunks
-
100g (about 3.5 oz) dried cranberries
-
100g (about 3.5 oz) shelled pistachios, roughly chopped
-
100g (about 3.5 oz) mini marshmallows
-
Optional for decoration: A dusting of icing sugar, extra chopped pistachios, dried cranberries, or a drizzle of melted white chocolate.
Equipment Needed
-
20cm x 20cm (8-inch) square baking tin
-
Baking paper or parchment paper for lining
-
Large heatproof mixing bowl
-
Saucepan for a double boiler (or microwave-safe bowl)
-
Spatula
-
Sharp knife for slicing
Instructions
Step 1: Prepare the Tin
Begin by thoroughly lining your square baking tin with baking paper. Ensure the paper overhangs on two opposite sides; these “handles” will make it incredibly easy to lift the set rocky road out of the tin later. Smooth out any wrinkles for a neat finish. Set the tin aside.
Step 2: Melt the White Chocolate Base
Create a double boiler by placing a heatproof bowl over a saucepan of gently simmering water, ensuring the bottom of the bowl does not touch the water. Add the chopped white chocolate, cubed butter, and golden syrup to the bowl. Stir gently and continuously with a spatula until the mixture is completely smooth, glossy, and well combined. This gentle heat prevents the white chocolate from seizing. Remove the bowl from the heat once melted. Alternatively, you can melt this mixture in a microwave-safe bowl in 30-second bursts on medium power, stirring well between each burst.
Step 3: Combine with Festive Mix-Ins
Allow the melted chocolate mixture to cool for 2-3 minutes. This prevents the marshmallows from melting when added. Now, add all your prepared festive mix-ins to the bowl: the broken biscuit chunks, dried cranberries, chopped pistachios, and mini marshmallows. Using your spatula, fold everything together until every piece is evenly coated in the luxurious white chocolate mixture. The combination of red cranberries and green pistachios creates a wonderfully festive color palette.
Step 4: Press into the Tin and Set
Pour the combined white chocolate rocky road mixture into your prepared tin. Use the spatula, and then clean, lightly damp hands to press the mixture down firmly and evenly into all corners. A firm press ensures the slice holds together well when cut. For a decorative finish, scatter a few extra cranberries, pistachios, or mini marshmallows on top and press them in gently.
Step 5: Chill Until Firm
Place the tin in the refrigerator for at least 3-4 hours, or preferably overnight, to allow the rocky road to set completely. This no-bake slice relies on the white chocolate re-solidifying to hold its shape.
Step 6: Slice and Serve
Once fully set, use the parchment paper handles to lift the entire slab of White Christmas Rocky Road out of the tin and onto a cutting board. Using a large, sharp knife (wiping it clean with a hot cloth between cuts helps get clean slices), cut into squares or rectangles. For a festive touch, you can dust the top with a little icing sugar just before serving to resemble snow.